Appendix
Volume I: Foundations
"The notation of the game is the memory of chess." -- Siegbert Tarrasch
This appendix contains three sections to support everything you have learned in Volume I. Appendix A teaches you to read and write chess notation so you can follow any game in any book. Appendix B walks you through setting up the board correctly every time. Appendix C is a glossary of every chess term used in this volume, with references back to the chapters where each concept is explained.
Keep this appendix bookmarked. You will come back to it often, especially as you begin reading games from other sources. Once algebraic notation becomes second nature, you will be able to read any chess game ever recorded, from a game played in 1851 to one played yesterday.
Appendix A: Algebraic Notation Guide
The Language of Chess
Chess has its own written language. It is called algebraic notation, and it is the standard system used worldwide to record and share chess games. Every chess book, every website, every tournament scoresheet uses this system. Once you learn it, you can read any chess game ever played.
The good news: it takes about fifteen minutes to learn. The system is simple, logical, and consistent. If you can read a map grid, you can read chess notation.
The Grid: Files and Ranks
Look at your chessboard from White's side. The board is an 8 by 8 grid. Every square on that grid has a unique name made of two characters: a letter and a number.
Files are the columns running from your side of the board to your opponent's side. They are labeled a through h, from left to right (from White's perspective).
Ranks are the rows running from left to right across the board. They are numbered 1 through 8, from bottom to top (from White's perspective).
Put the letter and the number together, and you have the name of a square.
- a1 is the bottom-left corner (from White's view)
- h1 is the bottom-right corner
- a8 is the top-left corner
- h8 is the top-right corner
- e4 is the e-file, 4th rank (a central square)
- d5 is the d-file, 5th rank (another central square)
Key point: The letter always comes first, always lowercase. The number always comes second. It is always e4, never 4e or E4.
When White sets up to play, the square a1 is in the bottom-left corner and h8 is in the top-right corner. This orientation never changes. Even when you are reading about a position from Black's point of view, the square names stay the same. The a1 square is always the a1 square.
The Center
The four squares in the middle of the board are d4, d5, e4, and e5. These are the most important squares in chess. You will see these square names constantly throughout this book and every other chess book you ever read. Controlling the center is one of the core principles of the game (see Chapter 7).
Piece Symbols
Each piece has a single-letter abbreviation used in notation:
| Symbol | Piece |
|---|---|
| K | King |
| Q | Queen |
| R | Rook |
| B | Bishop |
| N | Knight |
| (none) | Pawn |
Why N for Knight? Because K is already taken by the King. So the Knight gets N, the second letter of its name. You will get used to this quickly.
Why no letter for Pawns? Pawns are the most common piece in chess. To keep notation short, pawn moves use only the destination square with no letter prefix. When you see a move like e4, that is a pawn move. When you see Nf3, that is a Knight move. The presence or absence of a capital letter tells you which is which.
Reading Moves
Here is the complete system for reading chess moves. Each entry shows the notation and what it means:
Basic Moves
- Nf3 = A Knight moves to the f3 square.
- Bb5 = A Bishop moves to the b5 square.
- Qd1 = The Queen moves to d1.
- Ke2 = The King moves to e2.
- Rd1 = A Rook moves to d1.
- e4 = A pawn moves to e4.
- d5 = A pawn moves to d5.
The pattern is always the same: piece letter (if not a pawn) followed by the destination square.
Captures
When a piece captures an opponent's piece, an x appears between the piece and the square:
- Bxe5 = A Bishop captures whatever is on e5.
- Nxd4 = A Knight captures on d4.
- Qxf7 = The Queen captures on f7.
For pawn captures, you write the file the pawn came from, then x, then the destination:
- exd5 = A pawn on the e-file captures on d5.
- fxg6 = A pawn on the f-file captures on g6.
Castling
Castling has its own special notation:
- O-O = Kingside castling (the King moves two squares toward the h-file Rook).
- O-O-O = Queenside castling (the King moves two squares toward the a-file Rook).
These use the letter O, not the number zero. See Chapter 3 for the complete rules on castling.
Check and Checkmate
- + at the end of a move means check (the King is attacked).
- # at the end of a move means checkmate (the game is over).
Examples:
- Bb5+ = Bishop moves to b5, giving check.
- Qxf7# = Queen captures on f7, delivering checkmate.
Pawn Promotion
When a pawn reaches the last rank and promotes, you write the destination square, an equals sign, and the new piece:
- e8=Q = A pawn moves to e8 and becomes a Queen.
- a1=R = A pawn moves to a1 and becomes a Rook.
- g8=N+ = A pawn moves to g8, promotes to a Knight, and gives check.
Promotion is covered in detail in Chapter 3.
Move Annotations
Chess writers use symbols to comment on the quality of a move:
| Symbol | Meaning |
|---|---|
| ! | Good move |
| !! | Brilliant move |
| ? | Mistake |
| ?? | Blunder |
| !? | Interesting move (possibly good, worth considering) |
| ?! | Dubious move (probably not the best, but has some point) |
When you see Nf3! in a book, the author is telling you that Nf3 is a strong move. When you see Qh5??, the author is warning you that this Queen move is a terrible blunder.
These symbols are opinions, not rules. Different authors may annotate the same move differently. But the symbols give you a quick way to understand what the writer thinks about each move.
Reading a Game Score
A full chess game is written as a numbered list of moves. White's move comes first, then Black's move, separated by a space.
Here is a real, complete game. This is one of the most famous games in chess history: the Scholar's Mate.
1.e4 e5
2.Bc4 Nc6
3.Qh5 Nf6??
4.Qxf7#
Let's read it move by move:
- 1.e4 = White's first move. A pawn moves to e4.
- e5 = Black's first move. A pawn moves to e5.
- 2.Bc4 = White's second move. A Bishop moves to c4.
- Nc6 = Black's second move. A Knight moves to c6.
- 3.Qh5 = White's third move. The Queen moves to h5.
- Nf6?? = Black's third move. A Knight moves to f6. The ?? tells you this is a blunder.
- 4.Qxf7# = White's fourth move. The Queen captures on f7, and it is checkmate.
Set this game up on your board and play through it. You will see exactly how Scholar's Mate works. (This trap is discussed in Chapter 7, along with how to avoid falling for it.)
When a game ends, the result is written at the end:
- 1-0 means White won.
- 0-1 means Black won.
- 1/2-1/2 means the game was a draw.
So the full score of the game above would end with 1-0.
Partial Moves
Sometimes you will see only Black's move written with three dots:
15...Nf6 means "Black's 15th move was Nf6." The three dots indicate that White's move has been skipped or discussed separately.
Disambiguation
Sometimes two identical pieces can move to the same square. When this happens, you need extra information to show which piece moved.
Example: Suppose White has Knights on b1 and f3, and both could move to d2. Just writing Nd2 would be confusing. Which Knight moved?
The solution: add the file letter of the piece that moved.
- Nbd2 = The Knight from the b-file moves to d2.
- Nfd2 = The Knight from the f-file moves to d2.
If the pieces are on the same file but different ranks, you use the rank number instead:
- N1f3 = The Knight from the 1st rank moves to f3.
- N4f3 = The Knight from the 4th rank moves to f3.
In very rare cases, you might need both the file and the rank to be clear (such as with three Queens on the board after multiple promotions), but this almost never happens in real games.
FEN Notation: A Brief Introduction
Throughout this book, you will see lines like this beneath diagram positions:
This is called FEN (Forsyth-Edwards Notation). It is a way to describe any chess position in a single line of text. You do not need to learn FEN to read this book. Every position in this book is described in plain language and has "Set up your board" instructions.
However, FEN is extremely useful if you play chess online or use chess software. You can copy a FEN string into almost any chess website or app, and it will instantly set up the exact position on your screen. This lets you follow along digitally and explore variations with an engine.
How FEN works (briefly):
A FEN string has six parts, separated by spaces:
- Piece placement = The position of every piece on the board, described rank by rank from the 8th rank (top) to the 1st rank (bottom). Uppercase letters are White pieces, lowercase letters are Black pieces. Numbers represent consecutive empty squares. Slashes separate ranks.
- Active color = Either w (White to move) or b (Black to move).
- Castling availability = Which sides can still castle. K = White kingside, Q = White queenside, k = Black kingside, q = Black queenside. A dash means no one can castle.
- En passant target = If a pawn just moved two squares, this is the square behind it (the en passant capture square). A dash means no en passant is possible.
- Halfmove clock = The number of moves since the last pawn move or capture (used for the 50-move draw rule).
- Fullmove number = The current move number, starting at 1.
If you want to explore FEN further, any chess website will have a board editor that can generate and read FEN strings. For now, just know that the FEN lines in this book are there to help you set up positions digitally, and you can safely ignore them if you prefer to use a physical board.
🛑 Rest Marker. You now know how to read chess notation. The rest of this appendix covers board setup and the glossary. Take a break if you need one.
Appendix B: Board Setup Guide
Setting Up the Board
Before you can play, you need to set up the board correctly. This section walks you through the entire process, step by step. If you have never set up a chessboard before, follow these instructions with your board in front of you. If you have set up a board before but are not 100% sure you are doing it right, follow along anyway. Getting the setup wrong is one of the most common mistakes beginners make, and it leads to confusion that can last for years.
The One Rule You Must Remember
Light square in the bottom-right corner.
Look at your board. The squares alternate between light and dark colors. When you sit down to play, the square in the bottom-right corner (closest to your right hand) must be a light-colored square.
An easy way to remember this: "White on right." The light (white) square goes on your right side. This rule applies no matter which color you are playing.
If the board is turned the wrong way, all the piece positions will be mirrored, and the queen will end up on the wrong color. So always check this first.
Step-by-Step Setup
Follow these seven steps with your board in front of you.
Step 1: Orient the Board
Place the board between you and your opponent (or between you and an imaginary opponent if you are studying alone). Make sure the light square is in your bottom-right corner. White on right.
Step 2: Place the Rooks
Rooks go in the four corners.
- White Rooks on a1 and h1 (the corner squares of your first rank).
- Black Rooks on a8 and h8 (the corner squares of Black's first rank).
Rooks look like castle towers. Corners for the castles. Easy to remember.
Step 3: Place the Knights
Knights go next to the Rooks.
- White Knights on b1 and g1.
- Black Knights on b8 and g8.
Knights look like horses. They stand right next to the corner towers.
Step 4: Place the Bishops
Bishops go next to the Knights.
- White Bishops on c1 and f1.
- Black Bishops on c8 and f8.
Bishops have a pointed top (like a mitre, the hat a bishop wears). They take the next spots inward.
Step 5: Place the Queen
Here is the rule that prevents the most common setup mistake:
The Queen goes on her own color.
- The White Queen goes on d1, which is a light square. White Queen on a white square.
- The Black Queen goes on d8, which is a dark square. Black Queen on a dark square.
If your Queen is not on her matching color, something is wrong. Check your board orientation (Step 1). "The queen gets her own color" is the phrase that will save you every time.
Step 6: Place the King
The King takes the one remaining square in the back row.
- White King on e1.
- Black King on e8.
The King and Queen stand side by side in the center of the back rank. The King is usually the tallest piece on the board, with a cross or a rounded top.
Step 7: Place the Pawns
Line up all eight Pawns on the rank directly in front of your other pieces.
- White Pawns fill the entire 2nd rank: a2, b2, c2, d2, e2, f2, g2, h2.
- Black Pawns fill the entire 7th rank: a7, b7, c7, d7, e7, f7, g7, h7.
Pawns are the smallest pieces. They form a wall of soldiers in front of your army.
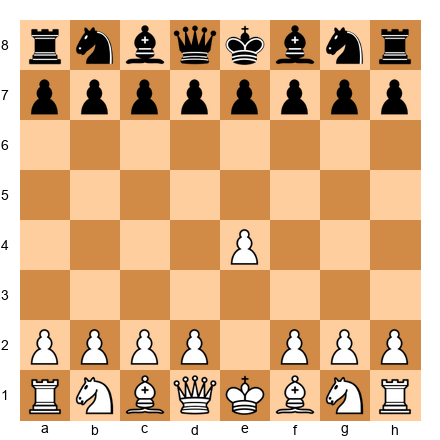
The Finished Board
When setup is complete, your board should look like this:
Black's side (8th rank): Rook, Knight, Bishop, Queen, King, Bishop, Knight, Rook Black's Pawns (7th rank): Eight pawns in a row (Empty ranks 3 through 6) White's Pawns (2nd rank): Eight pawns in a row White's side (1st rank): Rook, Knight, Bishop, Queen, King, Bishop, Knight, Rook
Memory Trick
If you need a quick way to remember the piece order, here is a sentence:
"Rooks in corners, Knights hop next, Bishops angle in, Queen on her color, King fills the gap, Pawns stand guard."
Say it out loud a few times. Set up the board while saying it. After three or four times, you will never forget the order again.
Common Setup Mistakes
Mistake 1: Board is turned the wrong way. If the dark square is in your bottom-right corner, the board is backwards. Rotate it 90 degrees. White on right.
Mistake 2: King and Queen are swapped. If the White Queen is on a dark square, she is on the wrong side. Remember: Queen on her own color.
Mistake 3: Bishops and Knights are swapped. The Knights go next to the Rooks (in the corners). Knights are the jumpers; they like being near the edges where they can leap over the pawn wall.
Mistake 4: Rooks are not in the corners. If nothing else, remember this: Rooks are tower-shaped pieces that live in the corners, like guard towers on a castle wall.
🛑 Rest Marker. Board setup is complete. The glossary follows. Use it as a reference whenever you encounter an unfamiliar term.
Appendix C: Glossary
All chess terms used in Volume I, listed alphabetically. Each entry includes a brief definition and a reference to the chapter where the concept is covered in detail.
Back rank The 1st rank for White and the 8th rank for Black. The row where the King, Queen, Rooks, Bishops, and Knights start the game. A "back rank mate" occurs when a Rook or Queen delivers checkmate on the opponent's back rank, and the King is trapped by its own pawns. See Chapter 2.
Bishop pair Having both of your Bishops on the board while your opponent has lost one or both of theirs. Because one Bishop controls light squares and the other controls dark squares, the pair together can cover the entire board. The Bishop pair is a small but real advantage, especially in open positions with few pawns blocking the diagonals. See Chapter 4.
Blunder A very bad move that loses significant material or the game itself. In notation, a blunder is marked with ??. Everyone blunders, from beginners to World Champions. The goal is not to never blunder but to blunder less often as you improve. See Chapter 6.
Breakthrough A pawn advance that sacrifices one or more pawns to force a remaining pawn through to promotion. In pawn endgames, breakthroughs can turn a drawn-looking position into a win. The key is recognizing when the sacrifice creates a passed pawn that the opponent's King cannot catch. See Chapter 9.
Capture Removing an opponent's piece from the board by moving your piece to its square. Your piece replaces the captured piece on that square. In notation, captures are indicated with an x (for example, Bxe5). See Chapter 1.
Castling A special move involving the King and one of the Rooks. The King moves two squares toward the Rook, and the Rook jumps over the King to the square on the other side. Kingside castling (O-O) moves the King toward the h-file. Queenside castling (O-O-O) moves the King toward the a-file. Castling can only be done if neither the King nor the Rook has moved, the squares between them are empty, the King is not in check, and the King does not pass through or land on a square attacked by an enemy piece. See Chapter 3.
Center The four squares in the middle of the board: d4, d5, e4, and e5. Controlling the center gives your pieces more mobility and more options. Most opening strategies revolve around fighting for control of these squares. See Chapter 7.
Check An attack on the King. When your King is in check, you must deal with it immediately. You can move the King, block the check with another piece, or capture the attacking piece. You cannot ignore check or make a different move. In notation, check is marked with +. See Chapter 2.
Checkmate A position in which the King is in check and there is no legal way to escape. Checkmate ends the game immediately. The player who delivers checkmate wins. In notation, checkmate is marked with #. See Chapter 2.
Connected pawns Two or more pawns of the same color on neighboring files that can protect each other as they advance. Connected pawns are stronger than isolated pawns because they support each other. Connected passed pawns (passed pawns on neighboring files) are especially powerful in endgames. See Chapter 9.
Decoy A tactic that lures an opponent's piece to a specific square, usually a bad one. By forcing a piece to move to a particular location, you set up a follow-up tactic like a fork, pin, or checkmate. Decoys work because the opponent has no choice: the lured piece must go where you want it. See Chapter 6.
Deflection A tactic that forces a defending piece to leave its post, abandoning whatever it was protecting. Once the defender moves away, the target it was guarding becomes vulnerable. Deflection is closely related to removing the defender, but specifically involves forcing the defender to move rather than capturing it. See Chapter 6.
Development Moving your pieces from their starting squares to active squares where they control important parts of the board. In the opening, rapid development is one of the most important goals. A piece that is still on its starting square is not contributing to the fight. A piece that has been developed to an active square is working for you. See Chapter 7.
Diagonal A line of squares running from one corner of the board to the other at an angle. Bishops and Queens move along diagonals. For example, the a1-h8 diagonal runs from the bottom-left to the top-right corner. See Chapter 1.
Discovered attack A tactic in which one piece moves out of the way, revealing an attack from a piece behind it. The piece that moves may also deliver its own threat, creating a double attack. Discovered attacks are powerful because the opponent must deal with two threats at once. See Chapter 6.
Discovered check A special type of discovered attack in which the revealed attack is a check on the King. Because the opponent must deal with the check, the piece that moved is free to go anywhere, including capturing an unprotected piece. Discovered checks are among the most dangerous tactics in chess. See Chapter 6.
Double attack Any move that creates two threats at the same time. Forks are a type of double attack, but the term also covers situations where one piece attacks an enemy piece while simultaneously threatening something else (like a mating square). The power of double attacks is that the opponent can only deal with one threat per move. See Chapter 6.
Double check A discovered check in which both the moving piece and the revealed piece give check at the same time. The only way to escape double check is to move the King. You cannot block or capture your way out of double check because there are two checking pieces. See Chapter 6.
Doubled pawns Two pawns of the same color on the same file, usually created when a pawn captures and lands on a file that already has a friendly pawn. Doubled pawns are generally a weakness because they cannot protect each other and are harder to advance. However, doubled pawns are not always bad; sometimes the open file created by the capture is worth the structural weakness. See Chapter 4.
Draw A game that ends without a winner. Draws can happen by stalemate, agreement between the players, threefold repetition (the same position occurs three times), the 50-move rule (50 consecutive moves with no pawn move and no capture), or insufficient material (neither player has enough pieces to checkmate). See Chapter 2.
En passant A special pawn capture that can occur when an opponent's pawn moves two squares forward from its starting position and lands beside your pawn. You may capture it "in passing" by moving your pawn diagonally to the square the opponent's pawn passed through. En passant must be played on the very next move or the right is lost. See Chapter 3.
Endgame The final phase of the game, when most pieces have been traded and only a few remain on the board. Endgames often come down to King and pawn play. Knowing basic endgame technique, like opposition, key squares, and the Rule of the Square, is essential for converting advantages into wins. See Chapter 9.
Exchange, the Winning a Rook for a minor piece (a Bishop or Knight). When you trade your Bishop or Knight for your opponent's Rook, you have "won the Exchange." The Exchange is worth about 2 points of material advantage. This term specifically refers to the Rook-for-minor-piece trade, not just any trade of pieces. See Chapter 4.
Fianchetto Developing a Bishop to b2, g2 (for White) or b7, g7 (for Black) by first moving the pawn on the b- or g-file one square forward. The Bishop sits on the long diagonal, controlling the center from a distance. The Pirc Defense uses a fianchetto with ...g6 and ...Bg7. See Chapter 8.
File A vertical column of eight squares on the chessboard, labeled a through h. Rooks and Queens are especially powerful on open files (files with no pawns). See Chapter 1.
Fork A tactic in which one piece attacks two or more enemy pieces at the same time. The attacker threatens multiple targets, and the defender can only save one. Knight forks are the most common type, but every piece can deliver a fork. See Chapter 6.
Gambit An opening in which one side sacrifices material (usually a pawn) to gain another advantage, such as faster development, control of the center, or an attack on the opponent's King. A gambit is a calculated risk, not a random sacrifice. See Chapter 7.
Hanging piece A piece that is undefended and can be captured for free. Leaving a piece "hanging" means it has no protection. Spotting hanging pieces (both yours and your opponent's) is one of the most important skills at the beginner level. See Chapter 6.
Hypermodern A school of chess thought from the early 20th century that argued you do not have to occupy the center with pawns to control it. Instead, hypermodern players control the center from a distance using pieces, especially fianchettoed Bishops. The Pirc Defense is a hypermodern opening. See Chapter 8.
Initiative Having the ability to create threats and force your opponent to react. The player with the initiative is "calling the shots," while the opponent must spend moves defending. Gaining the initiative through rapid development and central control is a key opening goal. See Chapter 7.
Isolated pawn A pawn with no friendly pawns on either neighboring file. Because it has no pawn neighbors to protect it, an isolated pawn must be defended by pieces. Isolated pawns are a structural weakness, though they can sometimes be offset by active piece play. See Chapter 4.
Key squares In King and Pawn endgames, the squares that the attacking King must reach to guarantee promotion of a pawn. If the King reaches a key square, the pawn will promote regardless of what the defending side does. Key squares depend on the pawn's position and are essential knowledge for converting endgame advantages. See Chapter 9.
King safety The concept of keeping your King protected from attack, especially during the opening and middlegame. Castling is the primary method of achieving King safety, as it tucks the King behind a wall of pawns and connects the Rooks. A King that stays in the center too long is vulnerable to tactical attacks. See Chapter 7.
Kingside The right half of the board from White's perspective: the e, f, g, and h files. The Kingside is where White's King typically castles (O-O). See Chapter 1.
Legal's Mate A classic checkmate pattern in which a piece is sacrificed (usually the Queen) to set up a quick checkmate with minor pieces. Named after the French player Sire de Legal. It exploits an opponent who captures the offered Queen without noticing the mate threat behind it. See Chapter 6.
London System A solid, reliable opening system for White that begins with 1.d4 and 2.Bf4 (or 2.Nf3 followed by Bf4). White develops the dark-squared Bishop to f4 before playing e3, creating a sturdy pawn structure and safe King position. The London System can be played against almost any Black setup, making it ideal as a first opening repertoire. See Chapter 8.
Material The total value of pieces on the board. A player who has more material (more pieces or more valuable pieces) has a material advantage. Standard piece values: Pawn = 1, Knight = 3, Bishop = 3, Rook = 5, Queen = 9. The King is not counted because it cannot be captured. See Chapter 4.
Middlegame The phase of the game between the opening and the endgame, when most pieces are still on the board and active battles are taking place. Plans, tactics, and positional maneuvering all play a role in the middlegame. No clear line separates the opening from the middlegame; the transition happens gradually as pieces are developed and plans are formed. See Chapter 7.
Notation (algebraic) The standard system for recording chess moves. Each square is identified by a letter (a-h) and number (1-8). Piece symbols (K, Q, R, B, N) are combined with square names to record moves. See Appendix A for the full guide.
Opening The first phase of the game, typically the first 10 to 15 moves. The main goals of the opening are to develop pieces, control the center, and get the King to safety through castling. See Chapter 7.
Opposition A critical concept in King and Pawn endgames. Two Kings are "in opposition" when they stand on the same file or rank with one empty square between them. The player who does NOT have to move holds the opposition, which is an advantage because it forces the other King to give way. Opposition often determines whether a pawn endgame is won or drawn. See Chapter 9.
Overloaded piece A piece that is trying to do two jobs at once and cannot handle both. If a Rook is simultaneously protecting a pawn and guarding against a back rank mate, it is overloaded. By attacking one of the things it protects, you force it to abandon the other. See Chapter 6.
Passed pawn A pawn with no opposing pawns in front of it on the same file or on either neighboring file. A passed pawn has a clear path to promotion and must be stopped by pieces rather than pawns. Passed pawns become increasingly dangerous as more pieces are traded, because there are fewer pieces available to stop them. See Chapter 9.
Pin (absolute and relative) A tactic in which a piece attacks an opponent's piece that cannot (or should not) move because doing so would expose a more valuable piece behind it. An absolute pin involves the King: the pinned piece literally cannot move because doing so would put the King in check, which is illegal. A relative pin involves a piece other than the King: the pinned piece can legally move, but doing so would lose the more valuable piece behind it. See Chapter 6.
Pirc Defense A hypermodern opening for Black that begins with 1...d6, followed by ...Nf6 and ...g6. Black allows White to build a pawn center, then attacks it from the flanks using a fianchettoed Bishop on g7. The Pirc is a flexible and durable defense that avoids heavy memorization. See Chapter 8.
Promotion When a pawn reaches the 8th rank (for White) or the 1st rank (for Black), it must be replaced by a Queen, Rook, Bishop, or Knight of the same color. This is called promotion. Most players promote to a Queen because it is the most powerful piece, but promoting to another piece (underpromotion) is sometimes the best choice. See Chapter 3.
Queenside The left half of the board from White's perspective: the a, b, c, and d files. The Queenside is where the Queen starts and where queenside castling (O-O-O) sends the King. See Chapter 1.
Rank A horizontal row of eight squares on the chessboard, numbered 1 through 8 from White's side. White's pieces start on the 1st and 2nd ranks. Black's pieces start on the 7th and 8th ranks. See Chapter 1.
Removing the defender A tactic in which you capture or drive away a piece that is protecting a key target. Once the defender is gone, the target it was guarding becomes free to attack or capture. Removing the defender is often the necessary first step before a fork, pin, or mating attack can succeed. See Chapter 6.
Repertoire A set of openings that a player uses regularly as both White and Black. Having a repertoire means you do not have to figure out what to play from scratch every game. You have studied specific openings and know the key ideas, plans, and typical middlegame positions. A beginner's repertoire should be simple and based on understanding rather than memorization. See Chapter 8.
Resignation Conceding the game before checkmate occurs. Players resign when they believe their position is hopeless and continued play would only delay an inevitable loss. You are never required to resign; you can always play on until checkmate. However, resigning a clearly lost position is considered polite in competitive chess. See Chapter 2.
Rule of the Square A visual shortcut for determining whether a King can catch a runaway pawn. Draw an imaginary square from the pawn to its promotion square, then extend it sideways. If the defending King can step inside the square on its move, it can catch the pawn. If it cannot, the pawn will promote. This technique saves you from having to calculate every move. See Chapter 9.
Sacrifice Voluntarily giving up material (a pawn, piece, or even the Queen) in exchange for a non-material advantage, such as a mating attack, a strong initiative, or a favorable position. Sacrifices can be speculative (risky) or sound (objectively correct). Learning when a sacrifice works and when it does not is a skill that improves with experience. See Chapters 6 and 7.
Scholar's Mate A four-move checkmate pattern: 1.e4 e5 2.Bc4 Nc6 3.Qh5 Nf6?? 4.Qxf7#. White aims the Queen and Bishop at the weak f7 pawn, delivering mate on the fourth move. Scholar's Mate only works if Black makes a specific mistake. It is easily prevented by ...g6 or ...Qe7. Learn it to avoid falling for it, not to rely on it. See Chapter 7.
Skewer A tactic that is the reverse of a pin. A piece attacks a valuable target, and when that target moves out of the way, a second piece behind it is captured. For example, a Bishop might check the King, and when the King moves, the Bishop captures a Rook behind it. Skewers require the two targets to be lined up on the same rank, file, or diagonal. See Chapter 6.
Smothered mate A checkmate delivered by a Knight in which the King is surrounded (smothered) by its own pieces and cannot escape. The most common smothered mate happens on the back rank when the King is boxed in by its own Rook and pawns. Smothered mates are rare in games but spectacular when they occur. See Chapter 5.
Stalemate A position in which the player whose turn it is has no legal moves and their King is NOT in check. Stalemate is a draw, not a loss. Even if one player has a massive material advantage, the game is drawn if the other player is stalemated. Avoiding accidental stalemate when you are winning is an important skill. See Chapter 2.
Tempo A unit of time in chess, measured in moves. "Gaining a tempo" means making a useful move while forcing your opponent to waste a move (for example, developing a piece with an attack that forces the opponent's piece to retreat). "Losing a tempo" means wasting a move without accomplishing anything useful. Controlling the tempo is closely related to having the initiative. See Chapter 7.
Trade Exchanging pieces of equal value with your opponent. For example, trading a Knight for a Knight or a Rook for a Rook. Trades simplify the position by reducing the total number of pieces on the board. Whether a trade is good or bad depends on the position. Generally, you should trade pieces when you have a material advantage (to simplify toward a winning endgame) and avoid trades when you are behind in material. See Chapter 4.
Underpromotion Promoting a pawn to a piece other than a Queen (to a Rook, Bishop, or Knight). Underpromotion is rare but occasionally necessary. The most common reason is promoting to a Knight to deliver a check or fork that a Queen could not. Sometimes promoting to a Rook instead of a Queen is necessary to avoid stalemate. See Chapter 3.
Zugzwang A German word meaning "compulsion to move." A position in which any move a player makes will worsen their position, but they are forced to move because passing is not allowed in chess. Zugzwang occurs most often in endgames, particularly King and Pawn endings. If your opponent is in zugzwang, every possible move they make will hurt their position. It is one of the most elegant ideas in chess. A full treatment of zugzwang appears in Volume II, but the concept is introduced through opposition in Chapter 9.
Appendix D: References and Further Reading
References
The following sources informed the content of Volume I. Numbers in brackets correspond to entries in the Master Bibliography (see BIBLIOGRAPHY.md in the Codex root directory).
Chess Instruction:
- [1] J. R. Capablanca, Chess Fundamentals. New York: Harcourt, Brace and Company, 1921.
- [9] I. Chernev, Logical Chess: Move by Move. New York: Simon & Schuster, 1957.
- [11] F.-A. D. Philidor, Analysis of the Game of Chess. London, 1749.
- [22] C. Lakdawala, How to Beat Your Dad at Chess. London: Gambit Publications, 2015.
- [27] L. Polgar, Chess: 5334 Problems, Combinations, and Games. New York: Black Dog & Leventhal, 1994.
Game Collections:
- [13] S. Tartakower and J. du Mont, 500 Master Games of Chess. New York: Dover Publications, 1952.
- [25] G. Kasparov, My Great Predecessors, Part I. London: Everyman Chess, 2003.
- [26] B. Fischer, My 60 Memorable Games. New York: Simon & Schuster, 1969.
Cognitive Science and Learning:
- [33] W. G. Chase and H. A. Simon, "Perception in chess," Cognitive Psychology, vol. 4, no. 1, pp. 55–81, 1973.
- [37] K. A. Ericsson, R. T. Krampe, and C. Tesch-Römer, "The role of deliberate practice in the acquisition of expert performance," Psychological Review, vol. 100, no. 3, pp. 363–406, 1993.
- [44] P. Saha, "The Effects of Chess on Academic Performance: A Systematic Review," Journal of Student Research, vol. 12, no. 4, 2023.
Neurodivergent Learning:
- [42] FIDE, "Infinite Chess: How FIDE's Infinite Chess Project Helps Autistic Children," Europe Chess Education, 2025.
- [43] FIDE, "Infinite Spectrum — Awareness and Recognition," 2024.
- [45] G. Sala and F. Gobet, "Cognitive and academic benefits of chess training: A meta-analysis," Educational Research Review, vol. 18, pp. 46–57, 2016.
Rules and Standards:
- [59] FIDE, Laws of Chess, 2023 ed. Lausanne: FIDE, 2023.
- [61] U.S. Chess Federation, Official Rules of Chess, 7th ed. New York: Random House, 2014.
Recommended Reading for Beginners
You have just completed Volume I. The books below are companions to what you have learned, and each one will strengthen a specific part of your game. They are listed in the order we recommend reading them.
1. Irving Chernev — Logical Chess: Move by Move (1957)
Every move in every game is explained. No other book does this. When you finish Volume I and want to see how strong players think through entire games, this is the place to start. Chernev writes clearly and never talks down to his reader. The games are old, but the thinking is permanent.
2. José Raúl Capablanca — Chess Fundamentals (1921)
Written by the third World Champion, this book teaches chess the way Capablanca played: with crystal clarity and no wasted moves. Over a hundred years old and still recommended by every serious coach. If you liked the endgame-first approach of Volume I, you will love this book.
3. László Polgár — Chess: 5334 Problems, Combinations, and Games (1994)
The father of the Polgár sisters built this massive puzzle collection to train his daughters, all of whom became among the strongest women players in history. Start with the mate-in-one puzzles and work your way through. Repetition is how tactical patterns become permanent.
4. Fred Reinfeld — 1001 Brilliant Ways to Checkmate (1955)
Pure tactical training. Every puzzle is a forced checkmate. Work through these with a physical board and no peeking at the answers. By the time you finish, you will see checkmate patterns in your sleep.
5. Dan Heisman — Everyone's Second Chess Book (2000)
This book addresses the thinking habits that separate beginners from improving players: how to use your clock, how to avoid blunders, and how to study effectively. It fills in the practical gaps that most instructional books skip.
6. John Nunn — Learn Chess Tactics (2004)
A clean, well-organized introduction to tactical motifs with carefully graded exercises. Nunn is a Grandmaster and a mathematician, and his writing reflects both: precise, logical, and efficient.
🛑 Rest Marker. You have finished the Appendix and all of Volume I: Foundations.
What Comes Next
You now have all the tools you need to play chess with understanding. You know the rules (Chapters 1 through 3), the values and trading principles (Chapter 4), the basic checkmates (Chapter 5), the core tactical patterns (Chapter 6), the opening principles (Chapter 7), a complete opening repertoire (Chapter 8), and the essential pawn endgames (Chapter 9). You know how to read notation, set up a board, and look up any term you have forgotten.
Volume II: The Club Player picks up where Volume I leaves off. It covers intermediate tactics, positional chess foundations, deeper opening theory, more complex endgames, and the thinking habits that separate improving players from those who stay stuck. If you have worked through Volume I carefully, played games, and solved the exercises, you are ready.
Set up your board. Play a game. Come back to Volume II when you are hungry for more.
End of Volume I: Foundations